Ever considered managing your property yourself vs hiring a property management company?
For the DIY-er property owner looking to manage their own rental property, and wondering where to start, this guide will give you the basic understanding oh how to rent our your house in Minneapolis.
In this article we’ll guide you through how to perform a market analysis to accurately price your property, what steps you need to take to get your property ready to rent, how to execute a lease, and what the day to day management looks like, and provide some additional tips so you can set yourself up for success.
Step 1: Confirm Your Property Is Eligible to Be Rented
Before doing anything, verify that your property can legally be rented.
- Zoning: Nearly all single-family homes are eligible to be rented within Minneapolis. But if you are looking at Short Term/AirBNB Style of rental, Minneapolis law limits one of these type of rentals per owner.
- HOA rules: This is the most frequent reason homeowners are not able to convert their property to a rental. Some HOA’s prohibit rentals in their community. To make sure you’re eligible to rent, reach out to your Association Manager or review the HOA’s bylaws
Now that you’ve confirmed you’re able to rent out your property, lets detail what you need to know.
Step 2: Obtain a Minneapolis Rental License
Before renting out your property, it’s important to get the correct licensing in place. Minneapolis requires all rentals have a rental license.
- Apply for a license through the City of Minneapolis Regulatory Services Department. You can access the form here. A temporary license is issued after applying.
- Schedule the property inspection & complete all the updates/repairs the Inspector identifies
- Renew your license annually by March 1st.
If you complete the city-hosted workshop for Rental Property Owners, you are eligible to save $250 on the conversion fee for a new rental license.
Step 3: Prepare the Property for Rent
Getting ready to rent out your property is important for a few reasons. First – the condition of the property directly effects the marketability of the property. Properties in better condition with more modern updates can charge more.
Secondly, your setting a benchmark on what the expectation on how the property needs to look when it’s vacated the Tenant.
And finally, everyone deserves a clean, well-maintained property they can call home.
To get your property ready, consider:
- Deep clean – the property thoroughly – rugs, walls, appliances, bathrooms fixtures, appliances, baseboards and windows.
- Make necessary repairs – everything should be in working condition when tenants move in
- Cosmetic updates – like painting may be necessary if there is significant ware & tare.
Each situation is unique, and each process around getting a property “rent-ready” is different.
But a good rule of thumb is to ask yourself what your expectations would be as a Tenant moving into a new property.
Step 4: Determine Rent Price and other Rental Requirements
Now that you’ve gotten your property ready to rent, it’s time to crunch some numbers.
- Understand your fixed costs – while financial goals may differ between owners & investors, where one wants a certain ROI, while another just wants to cover costs because they are moving out of town for a bit but plan on moving back. It’s important to set the groundwork by calculating your Principal, Interest, Tax, & Insurance. Additionally budget for maintenance & vacancies.
- Determine what the Tenant is responsible for – decide who is paying water, sewer, electric, gas, trash, internet, lawn care, snow removal, etc.
- Complete a Market Analysis – compare your property to similar properties on Zillow’s “Rent Zestimate”. It’s a great starting point to point.
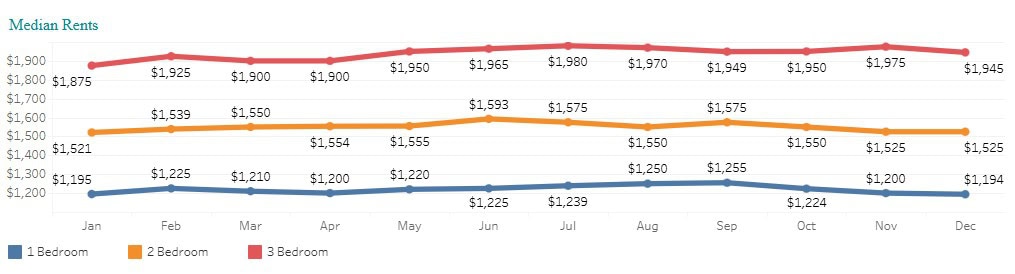
- Understand the market trends– Minneapolis and the surrounding suburbs tend to be seasonal. Busy during the summer months, and slow during winter. By marketing your property during the summer months you’re typically able to fill vacancies quicker and charge a higher rent.
*Source Housing Links Rental Anaylsis
When determining the price, don’t overlook the cost of vacancies. If you’re charging a premium compared to similar properties, it will take longer to rent.
Step 5: Create a Strong Rental Listing
As renters shift rental evaluation online, it’s critical to create a strong listing to help reduce turnover and vacancies and for you to maximize your rental potential.
- High-quality photos – take photos in well lit rooms and position the photos so they tell a story. Tenants should be able to understand the floor plan just by looking at photos
- Consider Video – Photos are great, but if done right videos can be even better. Consider creating a “walk-through” video of the property.
- List Property Details – like square feet, bedroom and bathroom count, heating/AC type, parking, pets, and other amenities.
- Lease Terms – detail what lease terms you’re offering, who is covering what utilities
- Tenant / screening criteria -3x income, credit score, criminal background etc
- Monthly rent – what is the total rent amount and highlight any other fees
- Contact Details – how to contact you with questions and ways to schedule a tour.
Showing and marketing your property is extremely time consuming, so the more information you provide, the better time spent when it comes to asking questions and doing walk-throughs.
Step 6: Screen Tenants Thoroughly and Fairly
Tenant screening is one of the most important steps when renting out your house in Minneapolis, and also the riskiest.
Not understanding Fair Housing and local laws is the easiest way to put yourself at risk of a lawsuit.
- Minneapolis approved screening criteria – Minneapolis you are going to follow. Either Inclusive Screening Criteria or the Individual Assesment Option.
- National Laws – familiarize yourself with and clearly understand Fair Housing and FCRA Rules
- Establish Background Criteria – what are your minimum requirements for income, credit, background, etc. Make sure the criteria you set is fairly applied to every applicant.
Now that you’ve got the groundwork in place, it’s time to perform a background check.
- Determine How you’ll Perform the Background – decide on whether you want to do it yourself, outsource to companies like TransUnion SmartMove, or a hybrid.
- Due Diligence – investigate anything that causes a red flag. With the ever growing presence of AI in our lives, it should come as no surprise that rental application fraud as jumped by 50% in one year.
Once you’ve found a tenant, and they’ve passed the background check and screening process, it’s time to create and execute a lease.
Step 7: Creating a Minneapolis-Compliant Lease Agreement
Leases are the contract between you as the landlord and the tenant, and the document used to establish and enforce expectations of both parties
Minneapolis provides a template that complies with all local laws and regulations, and there are many other resources online that have templates.
There are many other templates out there, but it’s advised to have an attorney review any template to make sure it’s enforceable and complies with local laws
Things to consider including in your lease:
- Rent/Dates – detail the basics of the lease like total rent amount, security deposit, any additional fees
- Responsibilities of Tenants – what utilities are they responsible for, who is responsible for lawn care and snow removal. All of these questions should explicitly laid out in the lease.
- Notice Requirements – what is the period required by either party to vacate the property after the lease has ended. Standard is 30-60 days
- Usage & Behavior Clause – pet policy, use of premise to restrict for residential use only, occupancy limits, and any other important clauses. If it’s not detailed what the property can and cannot be used for, it’s subjective.
- Lead paint – disclosure is required for houses built before 1978. You can use the EPA’s pamphlet here.
- What else is important for you – each property is unique, and each owner is unique. If there is a specific requirement you’d like to build into the lease.
Once the Lease is signed, it’s time to onboard the Tenant.
Step 8: Collect and Understand the Security Deposit Process
Nearly every landlord will collect a security deposit as part of renting out a property.
It’s important to understand, this is not your money. Which means there are strict rules when it comes to handling these funds.
- Held in a Separate Account – these are not your funds, and need to be separated from your day to day expenses in a separate checking account. You are holding them in trust for the Tenant and should never be used for personal use.
- Calculate Interest – Minnesota law which includes a simply 1% interest per annum on their security deposit. This amount is added back on to the Tenant’s deposit at the end of their lease.
- Minneapolis Deposit Limits – most cities and local governments don’t have limits on how much you can charge for a security deposit, but Minneapolis limits the amount of a security deposit to one month’s rent
Now that we know where to hold the money and how to handle out, it’s important to understand exactly what the Security Deposit can be used for,
- Security Deposits Can Be Used to Cover – unpaid rent or utilities, outstanding fees, property damage that falls outside the scope of “normal wear and tear”
- Security Deposits Can NOT Be Used to Cover – damage that falls within the scope of “normal wear and tar
- Deductions must be itemized – Minnesota law says that if you withhold any amount from the security deposit, you must include a detailed, itemized statement, listing each deduction down the penny.
- Returned with 21 days – Deposits must be returned no later than 21 days after the lease has ended. Penalties for failing to return the security deposit within this window can result in penalties equal to 2x the security deposit.
Like we highlighted in Step 3, establishing the benchmark is critical to ensure you’re legally allowed to charge for certain damages.
Step 9: Manage the Property Proactively
Half the process is done. You’ve placed a tenant, and they’ve moved in.
Now it’s time to consider how you plan to handle the day to day operations of ongoing management.
A few things to consider:
- Maintenance – what’s your approach to performing property maintenance and proactive care of the property.
- Collecting Rent – what options are you going to provide the tenant to pay their rent? T
- Bookkeeping – are you going to manage your financials in Excel or do you plan to use a property management system like Stressa?
- Emergencies – what’s your process around handling tenant lockouts or emergency maintenance calls in the middle of the night?
- Lease enforcement – in the unlikely scenario that the tenant is failing to abide by the lease, what processes or resources do you have in place to handle this?
- Tenant Experience – the biggest cost you’ll face as a landlord is property turnover. Not only from costs associated with turning the property, but the vacancies as well. As a landlord, you need to be able to be attentive, responsive, and provide exceptional service to retain the tenant. What processes or things do you have to provide this experience?
These are few common scenarios to think about, but when you’re dealing with housing, there are a lot of unknowns and variables that may surface.
Final Thoughts: On Self-Managing your Investment or Rental Property
Renting out your property and managing it yourself is doable, and many owners and investors in the Twin Cities have found success in self-managing their portfolio.
But management isn’t ‘passive’ by any stretches of the immagination. As an owner, you need to be available 24/7 and have processes in place to keep costs down through Tenant retention and avoidable maintenance expenses.
For the owner who doesn’t want to deal with ongoing management, ECR Property Management offers full-service Residential Property Management for one fixed monthly price.
Or maybe you like the idea of self-managing your property, but don’t want to handle emergency calls at 2:00 AM, or go off the grid for the weekend, we help with too with our After Hours Emergency Maintenance support.
May self-managing is the right path for you. But the idea of calls at 2:00am or getting interrupted on the weekend seems exhausting. If you don’t want to be available 24/7, we can help with that too. We provide After Hours Emergency Maintenance and weekend support as a standalone offering,